This came up for me because I’m building a test environment “clone” for a WordPress site I’ve made. The goal is to experiment on this test site without disrupting actual users or messing up SEO. Pro tip… if you are doing the same thing, essentially creating a live dev environment, make sure you choose the “don’t make this blog public” option. This will keep search engines from crawling the site and seeing it as duplicate content on your server and possibly hurting your rankings.
So here’s what I did. Got a second domain to use, uploaded the same version of WordPress (you can download any of the past versions here) then created a new DB to connect with. I visited the site URL and put in the name of the test site along with my admin ID, password etc. then logged in and updated a few settings. Now this is when I was ready to bring in all of the content from my live blog so I could test out how the new theme would look etc.
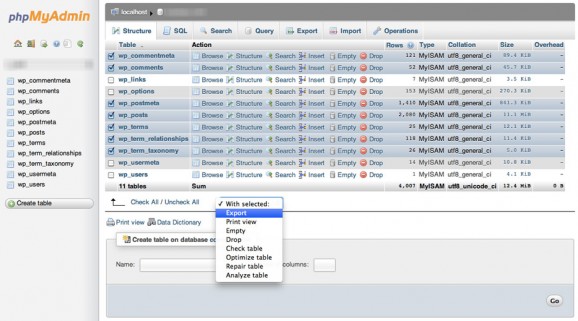
- Using phpMyAdmin, select the database you want to bring content over from. check the boxes next to each table you want to clone over, I chose wp_commentmeta, wp_comments, wp_postmeta, wp_posts, wp_terms, wp_term_relationships, wp_term_taxonomy
- At the bottom of this page use the dropdown that says “With Selected:” choose “Export” as shown below in the screenshot. This will export just the tables you want to clone over and won’t mess up any of the username and options stuff that was created when you installed WordPress. Check out the WordPress Codex section all about the database here for more info on each table and what it does.
- Now, select the brand new database for the test site. Before you import the clone tables you should empty out their equivalents to avoid errors about the key already being defined. You see, WordPress automatically creates a sample post and page and comment so if you don’t empty those in the DB first, it gets a conflict and halts the operation. To empty these tables just select them and choose “Empty” from the same drop down menu. That’s it!
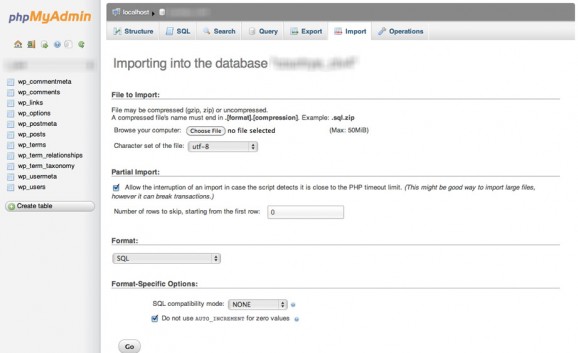
- Once you’ve emptied the rows you can import the clone data. Use the “Import” tab at the top of the page. Browse for the .sql file from step 1 and 2 above and upload it.
- The final step is to upload all of the images and files in the wp_content/uploads folder from your first site so the posts all look correct.

